Skip navigation

Category Archives: Tinkering

So this is about a long-term gripe I have, working (mostly) from a Linux desktop since well over 15 years now – and that is, getting email to work as “it’s supposed to be”. Which is a royal pain in the rear.

Let me elaborate. Before smtp server admins became really anal about spam and were blacklisting dial-up and random IP addresses, you simply used your default sendmail or postfix setup that came with your distro and everything was fine and dandy. Email clients just delegated sending to that MTA subsystem. After that good old time was over, you usually needed a smarthost to authenticate against – if you were lucky, it accepted arbitrary From-addresses, so you could even use it for both work and private mail, or share your box’s setup with your room mate.

When those last loopholes got closed, using a system-wide MTA for outgoing mail on a desktop machine quite apparently became a very, very bad idea (conceptually, and in terms of effort involved to make it work). I guess that was when everybody but die-hard Unixers switched over to all-in-one solutions like Thunderbird, Evolution, or KMail – which came with built-in MTA support. Still, there were corner cases – like mailing out patches from git or quilt, or dishing out signed gpg keys after the last keysigning party, that were, um, kinda hard to make work.

Not surprisingly therefore, the command line utilities used for that, initially nicely adhering to the Unix toolkit approach, soon grew MTA features like a hacker grows a beard. With varying levels of quality, and feature-completeness – and usually – the horror! – with the option (or the requirement), to store mail passwords in cleartext configuration files.

I personally plead guilty of tweaking/enhancing TLS support in caff (CA fire-and-forget – a nice script for signing and mailing gpg keys), because I was using Gmail for my private mail, which required that. Similarly, folks added TLS support to git-send-email, and surely tons of other not-primarily-MTA programs.

The bad news? Well, at least the two examples I gave don’t verify the server’s TLS cert at all, exposing you to trivial man-in-the-middle attacks. Or have you never used those programs in a hotel WLAN, or on a conference?

The next nice feature of a proper MTA, namely queueing mail if there’s temporarily no net, or the remote SMTP server is down, is even harder to achieve for those little tools – usually, people just queue meta-tasks then (like “TODO: re-run caff when I finally get out of this plane / send out patches to Jeff, he needs it by Monday”) – what a sucky state of affairs, in this day and age.

So, how to fix that? Well, don’t replicate MTA features all over the place – use a local, per-user MTA, plus a mail queue, and have all those tools, and your MUA, use that. After playing with sendEmail a bit (and even adding TLS cert fingerprint verification), I re-discovered msmtp, which does one thing extremely well – sending email. Plus, it has built-in support for Gnome Keyring and the Mac OS X Keychain, so you neither have to constantly type your passphrase on the terminal, nor store it plaintext. And it does TLS validation, and also (optionally) fingerprint checking. And it comes with a script to manage a local, per-user mail queue.

Well, I didn’t so much like that script, for all the wrong reasons – mostly, I probably was looking for excuses to tear it down into pieces and hack up my own solution – being two much shorter (and admittedly almost feature-less) variants thereof, enqueue.sh and runqueue.sh. The former just grabs all command line arguments, plus all of stdin, and stuffs it into a maildir-like queue – employing another little gem called safecat. The latter periodically processes all files in the queue, and then calling msmtp using the canned args and standard input. And sleeps when you’re offline.

Have now happily configured all of mutt, caff and git-send-email to just use enqueue.sh as their “sendmail” equivalent –

~/.gitconfig:

 [sendemail]
	envelopesender   = Thorsten 
	smtpserver       = /home/me/bin/enqueue.sh
	aliasesfile      = /home/me/.mutt/aliases
	aliasfiletype    = mutt

~/.caffrc:

 $CONFIG{'mailer-send'} = [ 'mailer', 'enqueue.sh -a gmail -f mail@for.me -- ' ];

~/.muttrc

 set sendmail="enqueue.sh -a gmail "

There were two rather minor bumps, first was a missing safecat for opensuse – I resuscitated an old spec file from cthiel, and added it to my opensuse buildservice repo. Debian of course has a package. Next was that opensuse’s msmtp did not have gnome keyring support enabled, presumably because it drags in some subset of the gnome stack as requirements. Naturally, on my desktop system, that’s an ignorable concern, so that’s now forked and added to my buildservice repo, too.
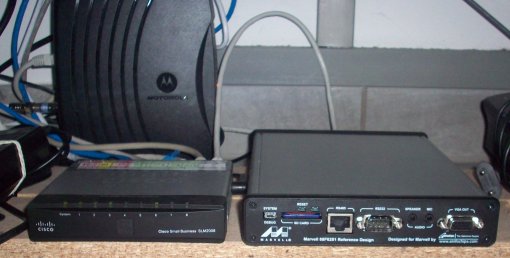
Both power consumption and imminent cease of Debian security updates for the sparc32 platform (I was running a trusty SparcStation 10 still) made me look for a worthy replacement. Some requirements: three or more ethernet ports, very low power consumption, must run Linux (platform with all-open drivers gives extra points), and a RS232/RS485 jack for the solar power inverter read-outs.

I settled for GlobalScale’s openRD-client box, an ARM kirkwood-based design, which typically takes about 6 watts, has ample interface connectors, including two gigabit ethernet ports (yeah, I wanted three. well, turns out that brings you into a completely different price range – so I’ll simply use an USB-based NIC for my 3rd). Hardware arrived some 6 weeks ago, but there was no pressing need yet.

Well, while staying at the GSoC mentor summit, things suddenly went south, the SparcStation blew its scsi controller (and the attached disk’s interface as well), I lost ~3 days worth of email, and I had to hurry things a bit.

Here’s what I did to have stock Debian stable running on the box:

  • I upgraded u-boot to the latest version (it’s kind of the bios on those arm machines, first thing that gets run after a reset), as I needed support for booting off of sd cards:
    • grab latest image from the list at http://code.google.com/p/openrd/downloads/list (http://openrd.googlecode.com/files/openrd_uboot.zip currently)
    • put on toplevel dir of a random usb stick, insert into openrd-client, reset, then at the u-boot prompt:
      usbstart
      fatload usb 0:1 0x0800000 uboot.bin / ext2load usb 0:1 0x0800000 uboot.bin
      nand erase 0x0 0xa0000
      nand write 0x0800000 0x0 0xa0000
      

      If that turns out to be succesful, issue a reset.
      After that, you should see this:

       ** MARVELL BOARD: OpenRD-Client LE 
      
      U-Boot 1.1.4 (Oct 27 2009 - 21:57:24) Marvell version: 3.4.19
      
    • Ready to actually install now. I did it as outlined here
    • Most important difference: we’re not setting up a Sheevaplug (which is also quite nice), so in the above howto, issue a
      setenv arcNumber 2361
      

      instead. Memory setup, I/O register etc. are all hard-coded on arm, so picking the correct machine magic number is paramount for having a working setup (and not accidentally frying your hardware, because some I/O pins are mapped differently. You have been warned).

    • I then decided to build a custom kernel, as the existing lenny image was not supporting all the openrd-client features yet:
      • cloned repo
      • applied this patch on top of it
      • stripped down config (you want to select OpenRD client from the ARM Kirkwood section), make sure mmc drivers are built-in if you want to boot w/o initrd
      • make uImage doesn’t even take that long to build, on the actual machine (1.2GHz, FWIW)
    • You can then flash your kernel image to the internal rom, like this (assuming the image is less than 4MB in size):
      mmcinit
      ext2load mmc 0:1 0x00800000 uImage
      nand erase clean 0x00100000 0x00400000
      nand write 0x00800000 0x00100000 0x00400000
      

      This assumes the kernel image resides on the second partition of your sd card. Since u-boot’s mmc support is still a bit flaky, and sometimes fails to properly initialize the sd card after a reset, booting from internal flash comes in extremely handy – boots kernel from flash, kernel then sets up mmc nicely & grabs everything else from there). Which ends up with the following tweaked u-boot boot setup for me:

      setenv bootargs 'console=ttyS0,115200 root=/dev/mmcblk0p2 rw mtdparts=orion_nand:0x400000@0x100000(uImage)'
      setenv bootcmd 'nand read 0x800000 0x100000 0x400000; bootm 0x800000'
      saveenv
      

      (my root fs lives on the 2nd sd card partition)

    Really happy with it, now that it’s working:

Decided to put 11.2 on some spare HD bits of my MacBook last week. Here’s the log of things I did:

  • Grabbed newest refit, install docs here.
  • Wanted to install via the network install image (around 150MB) from a usb thumb drive, it’s such a hassle (and a waste) to go & and burn CDs for that. So I went for latest grub2 to make EFI/rEFIt boot from usb. More docs about grub2 efit booting:
    • usb boot on mac: german blog
    • grub background info
    • my grub2 setup (on a x86_64 system):
      • ./configure --with-platform=efi --enable-efiemu --enable-mm-debug --enable-grub-emu --enable-grub-fstest --enable-grub-emu-usb --prefix=place_you_have_write_permissions --target=i386
      • then make; make install
      • cd into place_you_have_write_permissions
      • cd into lib/i386-grub/i386-efi there
      • run ../../../bin/i386-grub-mkimage -v -d . -o grub.efi part_gpt hfsplus fat ext2 normal sh chain boot fixvideo appleldr loadbios loopback configfile fs_file fshelp halt handler help iso9660 linux ls minicmd probe reboot search video scsi msdospart bitmap blocklist fs_uuid kernel memrw part_msdos parttool ext2 extcmd hexdump minicmd read sfs xnu xnu_uuid 2>&1 | tail
        this should result in something like "grub-mkimage: info: writing 446 bytes of a fixup block starting at 0xa000"
        Note that in theory, you could just use ../../../bin/i386-grub-mkimage -d . -o grub.efi *.mod, only that this was simply hanging during boot for me – and I didn’t have the patience to bin-search those upteen modules to find the incriminating one. Thus the explicit list, which worked for me.
  • Prepare the usb stick:
    • you should be fine with using both ext2 or fat partitions on it
    • copy your openSUSE-11.2-NET-x86_64.iso into the toplevel dir of the stick
    • from place_you_have_write_permissions/lib/i386-grub/i386-efi, copy grub.efi and *.lst to a efi/grub/ dir on the stick (that’s where refit looks for bootable stuff)
    • put this into efi/grub/grub.cfg on the stick:
      menuentry "openSUSE install" {
       fix_video
       fakebios
       root (hd0,1)
       loopback loop /openSUSE-11.2-NET-x86_64.iso
       linux (loop)/boot/x86_64/loader/linux initrd=initrd splash=silent showopts install=file://openSUSE-11.2-NET-x86_64.iso?device=sdb*
       initrd (loop)/boot/x86_64/loader/initrd
      }
      
  • Put stick into macbook, select usb medium in refit boot screen, boot install image. For me, the installer was falling back to manual setup, so grab the next mirror to you from http://mirrors.opensuse.org/list/11.2.html, determine IP address for the host (“host <mirror_name>”), enter that into the field you get when selecting “http method” for the installation image. Path on that server usually is something like /pub/opensuse/distribution/11.2/repo/oss/ .
  • Proceed with normal installation. Easy as pie.
  • More general info for openSUSE on macbook:

Misc stuff I did:

  • most important first thing to do, to prevent 2nd degree burns on knees: echo -n 2400 > /sys/devices/platform/applesmc.768/fan1_min (you want to put that line into your boot.local script or something. and it’s nothing Linux is at fault, this is entirely broken on Apple’s side of things)
  • get headphones jack to actually output music: run alsamixer in terminal, press F6 and select “HDA intel”. Press F5 to show all mixer controls, un-mute “Speaker 1”.
  • for the iSight built-in camera: install isight-firmware-tools, mount your (hopefully still-existent) OSX partition (something like mount -t hfsplus /dev/sda2 /mnt, then extract the firmware via ift-extract -a /mnt/System/Library/Extensions/IOUSBFamily.kext/Contents/PlugIns/AppleUSBVideoSupport.kext/Contents/MacOS/AppleUSBVideoSupport. Reboot, and voila, camera is working.
  • everything else just worked out of the box.